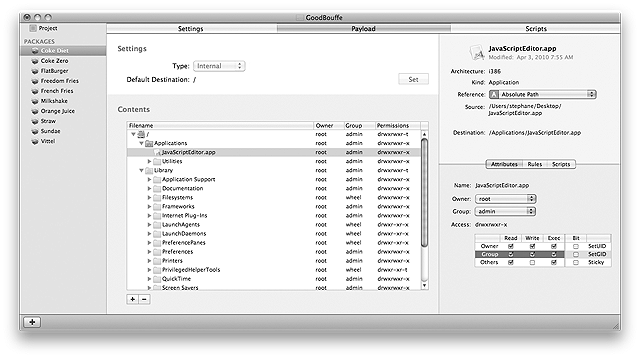
The package Payload tab let you define what and where files or folders should be installed.
To access the Payload tab of a package of a distribution project:
| 1 | Select the package in the source list |
| 2 | Click the Payload tab. |
The default destination is the location where Installer will install the items from the payload.
This is also the starting point that will be used by Packages to build the payload from the file hierarchy. You can spot the default destination in the hierarchy from its icon representing a folder with a red reticle over it.

By default, the default destination is set to be /. In 99.99% of cases, you won't need to change it.
To change the default destination:
| 1 | Select the folder for the default destination in the file hierarchy. |
| 2 | Click on the Set button. |
The Payload file hierarchy looks like the "View as List" mode of the Finder and it works the same way. You can add items, arrange them, rename some of them, etc.

The file hierarchy can contain the following 3 types of items:
| Type | Description |
|---|---|
| Standard folder | A standard folder represents a folder from the standard Mac OS X file hierarchy. A standard folder can be neither moved, removed nor renamed. |
| File system item | A reference to a real file or folder on disk. A file system item can be moved and removed. It can not be renamed. |
| Custom folder | A folder that does not exist on disk. A custom folder can be moved, removed and renamed. |
| Elastic folder | A folder that does not exist on disk and can represent a series of enclosed folders. An elastic folder can be moved, removed and renamed. Available when the Advanced Options are enabled. |
Notes:
|
To add a file system item to the file hierarchy:
| 1 | Select the folder in which you want to insert a new item. |
| 2 | Click the + button of the file hierarchy or choose Hierarchy > Add Files… |
| 3 | Select the file or folder you want to add. |
| 4 | Choose whether you want to keep the owner and group of the item on disk and which reference style should be used. |
| 5 | Click Add. |
Notes:
|
To add a custom folder to the hierarchy:
| 1 | Select the folder in which you want to insert a new item. |
| 2 | Choose Hierarchy > New Folder. |
| 3 | Type the name of the folder and validate with Return. |
To add an elastic folder to the hierarchy:
| 1 | Select the folder in which you want to insert a new item. |
| 2 | Choose Hierarchy > New Elastic Folder. |
| 3 | Type the name of the folder and validate with Return. |
| Note: Use the '/' file path separator to separate enclosed folders. e.g. myFolder/mySubfolder. |
To remove items from a file hierarchy:
| 1 | Select the items in the file hierarchy. |
| 2 | Click the - button of the hierarchy or choose Edit > Delete. |
| 3 | Click Remove. |
| Note: The item will only be removed from the file hierarchy, it will not be removed from disk. |
To reorder the items in the file hierarchy:
| 1 | Select the items in the file hierarchy. |
| 2 | Drag and drop them to the new location in the hierarchy. |
By default, when you add a reference to a real folder in the file hierarchy, its contents is not disclosed in the hierarchy.
To reveal the contents of a referenced folder:
| 1 | Select the referenced folder in the file hierarchy. |
| 2 | Choose Hierarchy > Expand > Fully. |
Notes:
|
The inspector pane on the right of the file hierarchy displays the attributes of the selected item(s) in the file hierarchy.

The inspector contains the following information:
| Value | Description |
|---|---|
| Icon | The icon for the file or folder as displayed in the Finder. |
| Name | The name of the file or folder. |
| Modification Date | The date of the last modification for the file or folder. |
| Architectures | Architectures supported by the executable if an executable is selected. |
| Type | The type of the item: a file, folder or custom folder. |
| Reference | The reference style for the item. |
| Source | The relative or absolute path of the item on disk. |
| Destination | The location where the item will be installed on disk. |
| Owner | The owner for the item after it's installed on disk. |
| Group | The group for the item after it's installed on disk. |
| Access | The access permissions for the item after it's installed on disk. |
To rename a custom folder:
| 1 | Select the custom folder in the file hierarchy. |
| 2 | Type the new name of the folder in the Name text field of the inspector. |
| 3 | Validate with Return. |
To change the reference style of an item:
| 1 | Select the item in the file hierarchy. |
| 2 | Choose the new style from the Reference popup button. |
To change the owner of an item:
| 1 | Select the item in the file hierarchy. |
| 2 | Choose the new owner from the Owner popup button. |
To change the group of an item:
| 1 | Select the item in the file hierarchy. |
| 2 | Choose the new group from the Group popup button. |
| Note: In 95% of cases, the owner of an item should be root and the group should be wheel or admin. If you set the owner and group to a specific user account and staff, you are probably doing something wrong. |
To change the access permissions of an item:
| 1 | Select the item in the file hierarchy. |
| 2 | Choose the new group from the Group popup button. |
Notes:
|
When a bundle (an application or a plugin) is selected, the rules attributes are available.

By default, it is not possible to install an older version of a package over a newer one.
To allow/forbid an older version of a package to be installed over a newer one:
| 1 | Select the bundle in the file hierarchy. |
| 2 | Click the Rules tab in the inspector. |
| 3 | Click the Allow Downgrade checkbox. |
By default, when a bundle, typically an application, is installed, it will be installed at the location defined in the hierarchy. If a previous version of the application was installed and then moved by the user, there will be two versions of the application disk.
It is possible to look for a previous version of a bundle during the installation and replace it with the version in the package. This is done with locator rules.
The following type of locator are supported:
| Type | Description |
|---|---|
| Standard | Look for previous versions based on the identifier and default location of the bundle. |
| JavaScript | Write your own locator code in JavaScript. |
To add a locator:
| 1 | Select the bundle in the file hierarchy. |
| 2 | Click the Rules tab in the inspector. |
| 3 | Click the + button of the locators list. |
| 4 | Choose the type of locator from the popup button. |
| 5 | Customize the locator settings. |
| 6 | Click OK. |
| 7 | Type the name of the locator and validate with Return. |
To remove one or multiple locators:
| 1 | Select the bundle in the file hierarchy. |
| 2 | Click the Rules tab in the inspector. |
| 3 | Select the locators you want to remove. |
| 4 | Click the - button. |
| 5 | Click Remove. |
To edit a locator:
| 1 | Select the bundle in the file hierarchy. |
| 2 | Click the Rules tab in the inspector. |
| 3 | Select the locator. |
| 4 | Click Edit… |
| 5 | Make the changes you want in the locator editor. |
| 6 | Click OK. |
To disable/enable a locator:
| 1 | Select the bundle in the file hierarchy. |
| 2 | Click the Rules tab in the inspector. |
| 3 | Select the locator. |
| 4 | Click the checkbox on the left of the locator name. |
To rename a locator:
| 1 | Select the bundle in the file hierarchy. |
| 2 | Click the Rules tab in the inspector. |
| 3 | Select the locator. |
| 4 | Click the name of the locator. |
| 5 | Type the new name and validate with Return. |
Notes:
|
When a bundle (an application or a plugin) is selected, the Scripts attributes are available.

It is possible to attach scripts that should be run before or after a bundle is installed.
To set a pre- or post-installation script:
| 1 | Click the appropriate Set… button. |
| 2 | Select the script you want to use. |
| 3 | Click Set. |
To remove a pre- or post-installation script:
| 1 | Click the appropriate Remove… button. |
| 2 | Click Remove. |
| Revision History | ||||||
|